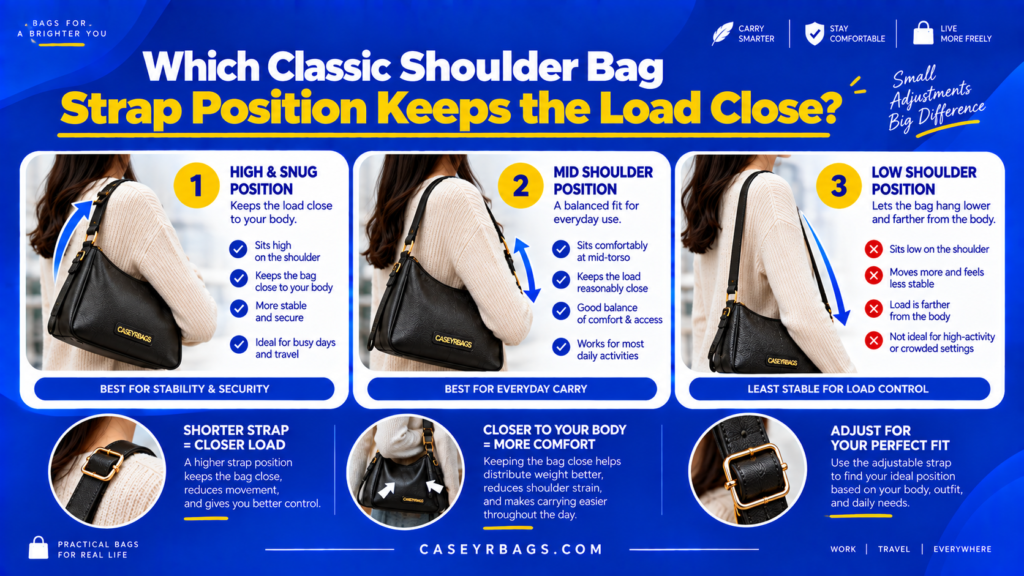
Which Classic Shoulder Bag Strap Position Keeps the Load Close?
A Classic Shoulder Bag generally keeps its load closer when the strap positions the bag relatively high along the side of the torso, where the bag body can maintain consistent contact without excessive outward swing. This usually requires enough strap drop for shoulder clearance but not so much that the bag hangs far below its intended side position.
The best position still depends on bag depth, width, anchor geometry, packed weight, and where dense items sit inside the bag. A slightly lower position may provide better overall fit if an excessively short strap crowds the upper arm or makes the bag difficult to access.
What Does “Keeping the Load Close” Mean in a Classic Shoulder Bag?
Keeping the load close means positioning the loaded Shoulder Bag so its mass remains reasonably near the body-facing side rather than projecting strongly outward or swinging through a large movement range. The bag does not need to be pressed tightly against the body.
Strap position determines where the bag body rests, but the internal contents determine where the effective load center actually sits. A shallow bag positioned close can still become outward-heavy if dense items are placed in an exterior pocket.
Useful close carry therefore combines appropriate strap position, controlled bag depth, and stable internal loading. Within the broader Shoulder Bag system, the strap positions the container while the contents determine where much of the load actually acts.
Which Features Determine How Close the Shoulder Bag Carries?
Strap drop, resting height, bag depth, bag width, anchor position, the body-facing panel, and internal load placement all affect the load’s proximity to the body. Each changes either the bag’s position or where the effective load center sits within that position.
Feature → load-proximity effect → carry consequence. Strap drop sets height, depth changes front-to-back distance, anchors influence orientation, and internal loading determines whether the actual mass stays near the body-facing plane.
Why Is Bag Contact Different From Load-Center Proximity?
The bag shell can touch the body while dense contents remain concentrated toward the outer side. In that case, exterior contact is close but the effective load center is still farther away.
Bag contact ≠ close load center. True close-load control depends on both where the container sits and where dense contents act inside it.
What Indicates That the Load Is Being Carried Close?
Useful signs include a predictable body-facing position, limited outward pull, manageable swing, limited rotation, and dense items that stay in a stable internal zone rather than migrating outward.
Close-load carry is a relationship between bag position and internal load position. The goal is controlled proximity, not maximum compression against the body.
Which Strap Position Usually Keeps the Shoulder Bag Closest?
A relatively high side position often reduces free movement and increases body-contact potential, but the useful target is a functional close-carry zone rather than the shortest possible setting.
How Does a Higher Side Position Keep the Bag Closer?
A higher side position shortens the effective suspension distance, keeps the bag higher against the torso, and reduces some free movement. This can increase body contact and shrink the available swing range.
Higher side position → shorter effective suspension → reduced free movement potential. The benefit ends when shoulder or arm clearance becomes restricted.
When Is a Mid-Side Position More Functional?
A mid-side position can provide sufficient body contact while preserving better shoulder clearance, easier opening access, and manageable movement. It can be more functional when a very high setting becomes crowded.
Mid-side position → usable clearance + controlled contact → carry-access balance. It is not universally ideal; it is one possible fit zone when the geometry and load support it.
Why Can a Very Low Position Reduce Close-Load Control?
A lower position can create a larger swing arc, more forward-back movement, and less continuous body contact because the bag hangs farther from the shoulder support point.
Lower does not automatically mean unstable, but it can increase movement freedom. The position should be judged by actual loaded behavior rather than height alone.
| Strap Position | Typical Bag Height | Body Proximity | Movement Potential |
|---|---|---|---|
| Higher side | Upper-side / near underarm | Higher potential | Lower–moderate |
| Mid-side | Side torso | Moderate–high | Moderate |
| Lower side | Near hip / lower side | Variable | Greater potential |
How Does Strap Drop Change Load Proximity?
Strap drop changes the bag’s vertical resting position and therefore the amount of body contact and movement freedom available at each setting.
How Does Shorter Strap Drop Affect Close Carry?
A shorter drop usually raises the bag and can increase body-contact potential. It may reduce free movement when the bag remains clear of the shoulder and upper arm.
Too little drop can restrict arm clearance, compress underarm space, distort strap angle, or make the opening difficult to reach. Shorter ≠ automatically better fit.
How Does Longer Strap Drop Affect Close Carry?
A longer drop lowers the bag and increases movement freedom. This can make access or repositioning easier, but some designs become less consistently body-facing as suspension distance increases.
Longer drop → lower position → greater movement range. The useful amount depends on whether the loaded bag remains controlled and accessible.
When Has Strap Drop Become Too Short to Improve Fit?
Upper-arm crowding, difficult shoulder entry, a distorted strap angle, restricted access, or a bag forced into an unnatural orientation all indicate that further shortening is no longer useful.
The closest possible position is not automatically the best close-load position. Functional clearance sets the upper limit of practical closeness.
How Does Bag Depth Affect Whether the Load Really Stays Close?
Bag depth controls the front-to-back distance available to the contents, so a high strap position cannot by itself keep a deep or outer-heavy load near the body.
How Does a Shallow Bag Profile Support Close-Load Carry?
A shallow profile keeps more internal volume near the body-facing plane and reduces outward projection. This can support more consistent body contact and lower effective load distance.
Shallow depth → internal volume closer to body-facing plane → lower outward-distance potential. Shallow is not automatically superior because width, anchors, and load still matter.
How Does Greater Bag Depth Move the Load Outward?
Greater depth allows contents to sit farther from the body-facing panel, especially when dense items occupy the outer half. The load center can therefore move outward even if the bag body itself sits high.
More depth → farther content position → greater load distance. Dense-item placement becomes increasingly important as depth grows.
Why Can Shortening the Strap Fail to Correct Excessive Depth?
Raising the bag changes vertical position but does not remove the front-to-back distance created by deep geometry. The load can remain far outward while the bag sits higher.
Strap position controls height; bag depth controls front-to-back load distance. Correct the geometry or loading source rather than shortening the strap indefinitely.
| Bag Profile | Potential Load Distance | Main Control Need |
|---|---|---|
| Shallow | Lower | Position |
| Moderate depth | Moderate | Position + organization |
| Deep | Higher potential | Dense-item placement |
| Deep + outer-heavy | Highest potential | Rebalance before strap adjustment |
How Does Strap Anchor Position Help Keep the Bag Body-Facing?
Anchor spacing and orientation determine how the chosen strap position translates into bag angle, tilt, and body-facing alignment.
How Do Separated Side Anchors Support Bag Orientation?
Two separated side anchors spread the strap’s influence across more of the bag body and can create broader control of the body-facing plane. This can reduce some free pivoting.
Balanced side anchors → broader orientation control → more predictable close carry. Two anchors still do not guarantee stability because load and depth also matter.
How Can Offset Anchor Geometry Pull the Bag Away From the Body?
Offset or uneven anchors can create tilt, outward rotation, unequal strap angles, or one end hanging lower. Those effects can turn the bag away from the intended close-carry plane.
Poor anchor orientation can defeat an otherwise useful strap height. The bag may remain high but still rotate outward.
Why Can Good Strap Position Still Fail With Poor Anchors?
Correct height + unstable orientation can still produce outward rotation or uneven body contact. Position and orientation are separate parts of the system.
Bag height and bag orientation are separate parts of close-load control. Strong anchors are useful only when their geometry also supports the intended body-facing plane.
Where Should Dense Items Sit to Keep the Load Close?
Dense-item placement determines the true internal load center after the strap position has already set the external bag height.
How Does Placing Dense Items Near the Body-Facing Side Affect the Load Center?
Dense contents closer to the body-facing panel keep more of the effective load near the bag/body interface. This can make close carry more predictable without prescribing one universal exact location.
Body-facing dense items → nearer load center → lower pull-away tendency. The useful zone depends on the bag’s compartment structure and normal contents.
What Happens When Dense Items Fill the Outermost Pocket?
Outer-heavy loading shifts the load center away from the body-facing plane and can increase rotational or pull-away tendency, even when the bag shell touches the body.
Outer-heavy load → outward load-center shift → pull-away/rotation potential. Shortening the strap cannot fully correct that internal loading pattern.
How Does End-Heavy Packing Affect Close Carry?
Dense contents concentrated at one end create tilt, uneven anchor demand, and less stable body contact. The bag may feel close on one side while the opposite end rotates away.
Close strap position cannot compensate for a poorly positioned dense load. Internal balance remains part of close-load control.
| Internal Load Pattern | Effective Load Position | Likely Bag Behavior |
|---|---|---|
| Dense items body-facing | Closer | More predictable |
| Centered contents | Moderate | Stable |
| Outer-heavy | Farther outward | Rotation/pull-away |
| End-heavy | Off-center | Tilt |
| Loose shifting contents | Variable | Changing position |
How Does Bag Width Affect Close Side Positioning?
Bag width changes how much surface can contact the side and how far the body extends toward the front or rear during walking.
How Can a Wider Bag Create More Body-Facing Contact?
A wider back or body-facing panel can create a broader contact area when the structure keeps that panel aligned with the side. This can support a more stable orientation in some designs.
More width can increase contact surface, but structure and anchors determine whether that surface actually stays body-facing.
When Can Excessive Width Reduce Close Positioning?
A very wide bag can extend around the front or rear, interfere with arm movement, or rotate more during walking. Greater contact area can therefore be offset by greater lateral span.
Excessive width can reduce the usefulness of a high position when the bag no longer fits cleanly within the side carry zone.
Why Must Width Be Evaluated With Strap Position?
The same high strap position can create different body contact, movement, and clearance on bags with different widths. Height alone cannot explain the final fit.
Close carry depends on bag geometry, not height alone. Width and strap position must be evaluated together.
How Does Bag Structure Affect a Close Strap Position?
Soft and structured bodies react differently when held close because shape retention changes how the bag conforms, projects outward, and keeps the load center positioned.
How Does a Flexible Classic Shoulder Bag Behave in a High Side Position?
A flexible bag can conform to the body but may also collapse around contents and change shape with the load. Dense items can therefore determine the final outward profile.
Flexible structure can support close carry when contents are controlled, but it becomes more load-dependent than a fixed-shape body.
How Does Greater Structure Change Close Carry?
A structured bag can preserve a predictable body-facing panel and more stable external geometry. If the bag is deep, that same rigidity can also preserve outward projection.
Greater structure → more predictable shell geometry. Structure does not automatically mean the load center is close.
Why Does Structure Not Automatically Determine Load Proximity?
A structured bag can still hold dense contents far outward, while a soft bag can carry close when its contents remain controlled near the body-facing side.
Load proximity depends on structure + depth + internal loading together. No construction type guarantees close carry by itself.
How Does Close Strap Position Affect Shoulder Bag Movement?
Reducing suspension distance and increasing body contact can reduce free movement, but movement remains a product of bag depth, load, anchors, and position together.
How Can Higher Positioning Reduce Swing?
A shorter movement path and greater body-contact potential can reduce the free arc available for forward-back swing. The bag has less space to accelerate away from the side.
Higher position → shorter movement path → smaller free swing potential. The effect remains conditional on depth, load center, and anchor orientation.
Can a High-Positioned Shoulder Bag Still Rotate?
Yes. A deep bag body, uneven internal load, poor anchor geometry, or loose contents can still create rotation even when the bag sits high.
High position does not eliminate rotational causes elsewhere in the system. Rotation should trigger a multi-factor check.
What Movement Indicates That the Load Is Not Staying Close?
Repeated outward swing, bag rotation away from the body, one end lifting or dropping, or constant manual repositioning all suggest that the load is not remaining in the intended close-carry zone.
Close carry should create predictable movement, not necessarily zero movement. Occasional motion is normal; persistent pull-away behavior is the useful signal.
How Does Access Affect the Best Close-Load Strap Position?
Close-load positioning becomes counterproductive when the bag is held so high that the opening, hand entry, or routine retrieval becomes difficult.
When Can a Very High Bag Position Restrict Access?
A very high position can compress the opening near the underarm, restrict hand entry, create an awkward zipper angle, or reduce visibility into the compartment.
Maximum closeness is not useful when normal access stops working. The highest practical position must still preserve functional retrieval.
Why Can a Slightly Lower Position Improve Overall Fit?
A small increase in drop can preserve good body contact while improving opening space, arm clearance, and repositioning. The bag can remain close without being forced into the underarm.
Slightly lower does not mean poorly controlled. It can improve the carry-access balance when movement remains manageable.
What Defines the Best Load-Proximity/Access Balance?
Look for a close body-facing position, manageable movement, usable shoulder clearance, and easy routine retrieval while the bag remains worn.
The optimal close-load position is the closest position that still works normally. Functional access is part of close carry, not a separate afterthought.
How Do Clothing Layers Affect Close-Load Strap Position?
Clothing volume occupies part of the same shoulder and underarm space used by the strap opening, so the identical setting can sit differently over bulkier layers.
How Do Thicker Layers Change Effective Strap Clearance?
More clothing volume leaves less available space under the same drop and can move the bag outward, higher, or into a tighter strap angle.
Thicker clothing → reduced effective clearance → altered loaded position. The change should be judged functionally rather than by a universal seasonal measurement.
Why Might the Strap Need Slight Repositioning With Bulkier Clothing?
A small increase in drop can restore shoulder clearance, natural bag orientation, and usable body-facing contact when thicker clothing occupies the original opening.
The adjustment should be minimal and functional. It should restore the close-carry zone rather than lower the bag farther than necessary.
Why Should Seasonal Adjustment Remain Functional Rather Than Numerical?
Different bags, clothing volumes, anchors, and body dimensions create different clearance changes, so one added measurement cannot apply universally.
Adjust until the loaded bag regains controlled proximity and access. Functional behavior should determine the setting.
When Is a Classic Shoulder Bag Strap Position Too High or Too Low?
A position is too high or low when its observable behavior creates persistent crowding, pull-away movement, or access problems rather than simply differing from a preferred height.
What Indicates the Strap Position Is Too High?
Severe underarm crowding, difficult shoulder entry, restricted access, a distorted bag angle, or strong arm interference all suggest that the position exceeds the practical upper limit.
Too high is a functional diagnosis. The bag should be lowered only enough to restore clearance and normal access while preserving close-load control.
What Indicates the Strap Position Is Too Low?
Excessive swing, poor continuous body contact, repeated forward-back movement, or constant repositioning can indicate that the bag hangs lower than useful for the load and geometry.
Too low does not mean universally unstable. It means the current position creates more movement than the intended close-carry task can manage.
What If the Bag Remains Outward Even at a Higher Position?
- Is strap position too low?
- Is the bag too deep?
- Are dense items outer-loaded?
- Are anchors rotating the bag outward?
- Is the bag overfilled?
Check bag depth, outer-heavy contents, anchor orientation, rigid structure, and overfilled pockets before shortening the strap again. Each can keep the load center outward despite a high shell position.
Persistent outward load is not always a strap-position problem. Diagnose the actual cause before changing height further.
How Should the Best Classic Shoulder Bag Strap Position Be Evaluated?
Final evaluation should use the normally loaded bag and test body contact, movement, clearance, and access before accepting the position.
What Should Be Checked Before Strap Adjustment?
Identify bag depth, bag width, the normal load, dense items, anchor positions, and expected clothing before changing the strap. These variables can create pull-away behavior that height alone cannot solve.
Start with the real loaded system rather than an empty bag. This prevents strap position from being used as a substitute for load or geometry correction.
What Should Be Observed While Carrying the Bag?
Observe resting height, body contact, outward projection, swing, tilt, arm clearance, and access while walking normally. The bag should stay predictably close without constant correction.
Then open the bag and retrieve a routine item. Close-load fit must survive the access task as well as static carrying.
Which Sequence Should Determine the Final Strap Position?
- Load the bag normally.
- Place dense items toward a controlled body-facing or central zone.
- Begin with a moderate strap position.
- Put the bag on the shoulder.
- Observe body contact and resting height.
- Walk normally.
- Check outward swing and rotation.
- Shorten slightly if the bag hangs unnecessarily low.
- Lengthen slightly if shoulder clearance or access is restricted.
- Open the bag and retrieve a routine item.
- Keep the position that preserves both close-load control and functional access.
Use the sequence in order so dense-item placement and a moderate starting position are established before the bag is judged in motion. Walking then reveals whether the current height creates outward swing or rotation.
Shorten or lengthen only slightly in response to the observed problem, then test routine access. Keep the position that preserves both close-load control and functional access without inventing a universal measurement.
How Can Close-Load Strap-Position Mismatches Be Avoided?
Mismatches are avoided by treating strap position as one variable inside a wider system of depth, width, anchors, loading, movement, and access.
Why Is “Shorten the Strap as Much as Possible” a Weak Rule?
Aggressive shortening can create underarm crowding, restricted access, poor shoulder clearance, or distorted bag orientation even if the bag shell moves closer to the body.
Maximum closeness is not the same as optimal close-load fit. The target is the highest practical position that still functions normally.
Why Is Body Contact Alone an Incomplete Test?
A touching bag can still contain dense outer-loaded contents, unstable internal mass, or poor anchor geometry. The shell may be close while the effective load center remains farther away.
Body contact ≠ close load center. Internal loading and orientation must confirm that the actual mass is also being carried close.
What Should Be Verified Before Accepting the Final Strap Position?
Verify strap condition, correct understanding of drop, normal loaded testing, dense-item placement, bag depth and width, body-facing anchors, shoulder and arm clearance, outward projection, manageable swing, limited rotation, and predictable access.
Also confirm that clothing layers are considered, the shortest setting is not treated as automatically best, and body contact is not confused with true load-center proximity. Final fit must balance proximity, clearance, movement, and access.
- Strap is intact.
- Strap drop is distinguished from total strap length.
- Bag is tested with its normal load.
- Dense contents are identified.
- Dense items are not unnecessarily concentrated in the outermost zone.
- Bag depth is considered.
- Bag width is considered.
- Strap anchors keep the bag reasonably body-facing.
- Bag rests close without severe underarm crowding.
- Shoulder entry remains practical.
- Upper-arm movement remains usable.
- Bag does not project outward more than its geometry requires.
- Swing remains manageable during normal walking.
- Persistent rotation is limited.
- Bag does not require constant manual repositioning.
- Main opening remains accessible.
- Routine contents can be retrieved while the bag is worn where intended.
- Clothing layers are considered.
- Shortest possible strap position is not automatically treated as best.
- Body contact is not confused with actual load-center proximity.
- Final fit balances load proximity, clearance, movement, and access.
Conclusion
A Classic Shoulder Bag generally keeps its load closest when the strap positions the bag relatively high along the side of the body while preserving enough shoulder and arm clearance for normal carry. This reduces unnecessary suspension distance and can help the bag maintain more consistent body contact.
The best position is not the shortest possible setting. Bag depth, width, anchor geometry, clothing, and dense-item placement determine whether the actual load center stays close. The strongest fit is the highest practical side position that keeps the loaded bag predictably body-facing without compromising shoulder clearance, movement, or routine access—and with dense contents positioned so the actual load center remains close as well.
FAQs
A relatively high side position can increase body contact and reduce unnecessary movement in some Classic Shoulder Bag designs.
The bag should not be forced so high that shoulder clearance, arm movement, or routine access becomes restricted. Functional closeness matters more than maximum height.
Shortening raises the bag and can reduce free movement, which may increase body-contact potential.
Actual load proximity also depends on bag depth, anchor geometry, and dense-item position. A short strap cannot fully correct an outer-heavy or deep load, especially when dense contents remain far from the body-facing side.
Possible causes include excessive bag depth, dense items in outer pockets, uneven loading, rigid geometry, or anchor orientation.
These factors can keep the effective load center outward even when the bag itself sits high. Persistent pull-away should therefore trigger a geometry and load check.